

How Do You Clean Screen Windows
Summary :

You lot must have used USB flash drive in daily work and study but did y'all ever clean it? Tin a wink bulldoze exist erased and reused? This article on MiniTool Website will provide you with a step-by-step tutorial on how to clean a USB flash bulldoze and you can have a try to see if it works fine for you.
Quick Navigation :
- When Practice Yous Demand to Clean a USB Flash Drive?
- How to Clean USB Flash Drive?
- Proposition: Dorsum up Data Before Proceeding
- Wrapping Things up
- User Comments
When Practise You Need to Clean a USB Wink Drive?
The USB flash bulldoze is a portable device for yous to transfer files betwixt computers even when there is no network. Notwithstanding, you need to make clean your flash bulldoze in the following scenarios.
Scenario 1
If your flash drive is onetime or corrupted, what will y'all do? Some of you may want to set up it without formatting, others are probable to have a new 1 and discard the old one at volition. Have you lot ever considered wiping all your personal information permanently before throwing information technology away? In this case, you lot must clean your USB drive to prevent any unexpected information disclosure.
Scenario ii
There is no more gratuitous space on your wink drive hence you can't transfer files with information technology whatever longer. To gratuitous up more space, you tin can opt to make clean your flash bulldoze and and so y'all can reuse it.
Scenario three
When your USB flash drive gets a virus by accident and you really desire to get rid of information technology completely. If you desire to use your infected flash drive normally again, it is a adept option to clean or format it.
Tip: Feel puzzled about wipe, format, delete and erase? Run into this guide - What Is Data Sanitization: Wipe vs Erase vs Format vs Delete.
How to Clean USB Wink Bulldoze?
Method one: Clean a USB Flash Drive via Windows File Explorer
To clean a USB flash drive, you tin can rely on Windows inbuilt format option which tin erase the data on the flash drive completely. There are two options for you lot: quick format and full format. Quick format can finish within seconds while full format allows you to clean your data for good. Let's get-go to clean the flash drive by performing a total format via File Explorer.
Step ane. Connect your USB flash drive to your computer.
Step ii. Open File Explorer and click on This PC from the left pane.
Step 3. Under Devices and drives, do a right-click on your flash drive and choose Format in the driblet-downward menu.
Tip: If your USB flash drive doesn't appear in Devices and drives, you can seek aid from this guide - Set USB Flash Drive Not Recognized & Recover Data – How To Do.
Step 4. Select File organisation and Allotment unit of measurement size respectively from the drop-down bill of fare. If yous don't know how to set it, you can follow the default options.
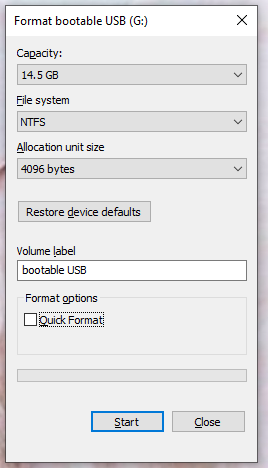
Step 5. Uncheck the Quick Format box and click on Start to start a total format of your flash drive.
If you lot tick Quick Format, the organization will only delete the root folder and the file arrangement table, and you lot can recover the deleted data. Unticking it volition enable the system to execute a total format operation and the time of formatting process depends on the size of the drive.
Warning: This activeness will erase all your data and it is unrecoverable. Therefore, it is adviced to create a backup with a piece of professional backup software before proceeding to avoid data loss.
Free Download
Method 2: Make clean a USB Wink Drive via DiskPart
Diskpart, a disk sectionalization utility in Windows, is too a condom fashion to clean a USB flash drive. Let me testify you how to clean flash drive using CMD.
Step ane. Plug in your USB wink bulldoze to your PC.
Step two. Press Win + South at the same time to evoke the search bar. Blazon cmd to locate Control Prompt and right-click on it to cull Run every bit administrator in the drop-down menu.
Step 3. Type diskpart and hit Enter.
Step 4. Blazon listing disk and printing Enter. You'll run into all the disk continued to the computer. In the disk list, determine your target flash bulldoze according to the size of the disk.

Step 5. Blazon select disk 10 and hit Enter. The x must be replaced with the disk number you identify in the last pace.
Step vi. Blazon clean all in the control window and hitting Enter. This procedure will have a lot of time, so delight wait patiently. Get out the command window until you see Diskpart succeeded in cleaning the disk.
Tip: In this pace, if you just type clean and hit Enter, information technology won't wipe your flash drive thoroughly and the deleted data is recoverable. To get rid of all the data on the flash drive for good, please deploy the clean all control.

Diskpart clean vs clean all: which ane to select? To make a wise option, learn the divergence first. When they fail, endeavour using MiniTool Partition Wizard.
After the process is done, all the partitions on the flash drive will be wiped out. If you want to reuse information technology, you lot tin can initialize the deejay.
Method three: Clean a USB Flash Bulldoze via Windows PowerShell
How to clean USB flash bulldoze? The 3rd method is to format it with Windows PowerShell commands. Windows PowerShell is a Windows command-line crush and scripting language tailored for system administrators. It combines the old CMD function with a new didactics gear up with inbuilt system administration.

What is Windows PowerShell? What is CMD? What are the differences between PowerShell and CMD? This post shows y'all the answers.
Pace 1. Connect your USB drive to your device. Correct-click on the Windows icon and highlight Windows PowerShell to launch it.
Step two. Type Get-Disk and press Enter to scan your target flash drive.
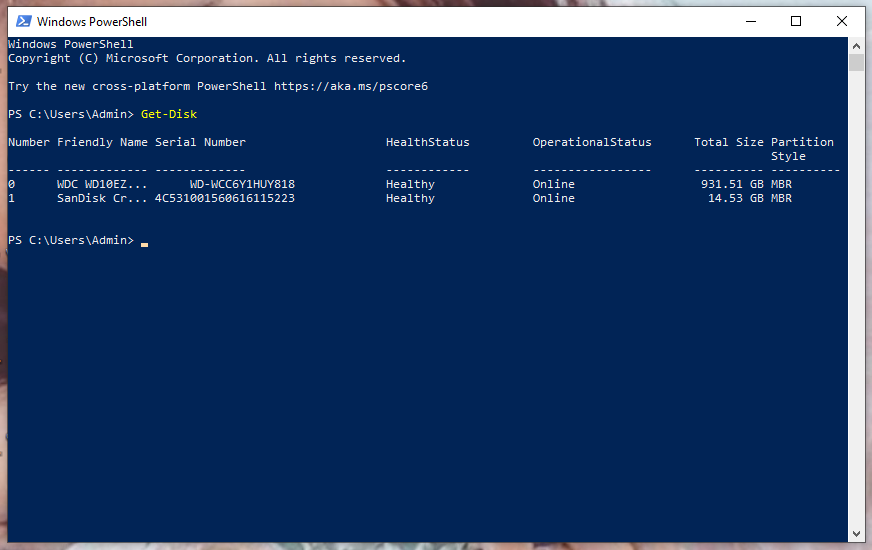
Step 3. Re-create Format-Volume -DriveLetter K -FileSystem FILE-SYSTEM -NewFileSystemLabel DRIVE-Name and press Enter to start a quick format on the flash drive. (G should be replaced with your target drive letter. FILE-Arrangement tin can exist substituted by NTFS, FAT32 or exFAT and DRIVE-Proper noun is supposed to be changed into the proper noun yous want it to display in File Explorer.)
Pace iv. Copy & paste the post-obit command and don't forget to hit Enter to perform a full format on the USB flash bulldoze.
Format-Volume -DriveLetter DRIVE-LETTER -FileSystem FILE-SYSTEM -Total -Strength
Method four: Clean a USB Flash Drive via Disk Management
How to clean USB flash drive? The 4th method is to clean information technology via Windows Disk Management. This is a Microsoft inbuilt utility which shows the layout, file system, capacity, status, type, and free space of each drive on your PC.
At the aforementioned time, information technology helps you to view and manage disks installed in your computer and the partitions. Here's how to make clean a USB drive with information technology.
Stride 1. Plug in your flash bulldoze to your reckoner. Do a right-click on the Windows icon and hit Disk Management to launch information technology.
Step 2. Right-click on your removable bulldoze and choose the Delete Volume option.
Tip: At times, something goes wrong with the Delete Volume choice and it is grey out. The solutions vary from situation to state of affairs. In terms of different solutions, y'all tin can visit the guide - four Cases for Delete Volume Greyed Out in Disk Management for help.

Footstep 3. Hit Yes to confirm this action.
Step four. Right-click on the Unallocated space and choose New Simple Book.
Pace 5. Click Next > Next to choose to utilise all the available space.
Stride 6. Tick Assign the following drive alphabetic character and assign a letter manually. It is noted that y'all had better select the letter in reverse guild.

How to change bulldoze letter in CMD in Windows 10? Check the detailed guides for how to modify/assign drive letter in Command Prompt Windows x.
Step 7. Tap on Next to continue and choose Format this volume with the following settings.
Step viii. Ready File arrangement to NTFS. If you set it to exFAT, you need to use respective commands in Control Prompt or Windows PowerShell.
Step 9. In the Allocation unit size driblet-down menu, choose Default.
Step 10. In Volume characterization, type a characterization to aid identify your wink bulldoze in File Explorer more than conveniently.
Step 11. Untick Perform a quick format and check Enable file and binder compression to start making a full format.

Step 12. Press Side by side and Stop to complete this activity.
As soon equally the procedure is done, it will fix most bug with the flash drive by creating a new partition and setting up the file system.
Suggestion: Back upwards Data Earlier Proceeding
Equally mentioned above, cleaning your flash drive past executing a total format will wipe all your data and all the formatted files are unrecoverable. You can't be too careful in every step. On tiptop of that, you had better support your important data to avert any unexpected data loss.
When it comes to fill-in, I strongly recommend y'all a piece of professional fill-in software, MiniTool ShadowMaker. It supports backing up files/folders, selected partitions, and even the whole deejay in Windows 11/10/eight/7. With a fill-in copy in hand, you can restore your lost files whenever the system crashes, deejay is formatted and files are inaccessible.
Without any chit-chat, let's dive correct into creating a file fill-in with this useful tool.
Step i. Download & install MiniTool ShadowMaker Trial Edition from MiniTool Store.
Gratuitous Download
Footstep 2. Later the installation process is done, double-click on the shortcut of it to launch it and hit Go along Trial at the elevation-right corner of the popping-upward window. Then, you tin can relish its service for free within 30 days.
Step 3. Go to the Backup functional page, and tap on Source in the right pane.
Footstep iv. There are two options for you: Disk and Partitions & Folders and Files. Choose the latter i as the source type.
Step 5. At present, y'all tin can select files/folders and ticking multiple files or folders at one time is permitted.

Step 6. Later making your decision, hit OK to render to the Backup functional folio.
Stride 7. Click on Destination to select a destination path to save your backup epitome.

Footstep 8. Click OK again and choose to commencement the backup task at in one case by hit Support Now.
Farther Tips on Other Advanced Functions:
- Options – During the process of backup, you lot tin can set some advanced parameters such every bit Image Creation Manner, File Size, Compression and Comment for your backup task past striking the Options button at the lower right corner.
- Schedule – This function is friendly to those who would like to create a backup on a regular basis. By default, the role is disabled and you need to plow it on manually. It allows you to customize scheduled backup Daily/Weekly/Monthly/On Event.
- Scheme – For those who desires to manage their disk space, performing some operations in Scheme is a adept option. It provides yous with iii types of fill-in: full backup, incremental backup and differential backup. Incremental backup is the default one to salve your space.

This postal service shows you how to fix the external hard drive needs formatting error and how to recover information from not formatted hard bulldoze before formatting.
Wrapping Things upward
Now, you are supposed to finish wondering how to make clean USB flash bulldoze on a PC if you follow each step diligently. What's more, never ignore the importance of backup and creating a backup with a reliable backup tool.
Exercise you really benefit from this article? Welcome to share your good news in the annotate expanse below. Or else you come across whatsoever issues while using MiniTool ShadowMaker, contact our back up team via [email protected].
Source: https://www.minitool.com/backup-tips/how-to-clean-usb-flash-drive.html
Posted by: morrisonvand1982.blogspot.com
0 Response to "How Do You Clean Screen Windows"
Post a Comment